Sunday, May 22, 2011

Basement Bedroom 3

Ceiling: The old hanging ceiling stopped short of the wall, so I put some gibboard between the joists to make an exposed beam effect for the part that is exposed. This required a team effort to get the long pieces of gibboard secured. There is a sliding piece to allow access to the electrical junction boxes.

Closet: the closet in the southwest corner came out (it was reducing the room size). And the closet in the northwest corner was enlarged.

Hot water heater was covered with a blanket and copper pipes insulated.

Basement Bedroom 2

After the rotten sill was replaced, the window could go in. Concrete blocks also went in around the window well to prevent the dirt from falling back in. These blocks came from a house demolished by the hospital across the street. They have been behind the shed for several years. When we got them out a surprise solution was found to a mystery: my van keys were back there buried by the stored blocks. They must have fallen out of my pocket when I was stacking them. I never replaced them because a new set costs $100 (thanks Ford!).

The closet in the corner came out and the tile floor began to go in. A wooden (oak) trap door was made to go above the sump cover.

Next: electrical work. Doug Ballantine helped and added all the new circuits. The two plugs in the master bedroom (southwest) were replaced and two more added. Three plugs were set into the concrete on the southern wall of the basement bedroom. Plugs were also added to the boiler room and basement office (northwest). The plugs under the basement window are one circuit (to accommodate an air conditioner). The other plug is double and has two circuits, one for each pump (in the same sump). Then the pumps in the boiler room sump were put on two different circuits. So for the pumps to fail, both circuits have to trip, or both pumps have to fail and the pumps/circuits in both sumps have to fail (because they are connected by underground pipe). But... if the electricity goes off, then the generator is needed (within five minutes of power outage, if there is heavy rain). So we still could get a flood, but it won't be because a pump failed or circuit tripped. And there is now less wooden floor and wall to get soaked.

To make the sump pump in the bedroom less conspicuous the pipes were renewed so that PVC pipes go close to the wall. A drain for the dehumidifier was incorporated. Removing the old exit pipe revealed a hole in the wall that was letting mice in. To improve the drainage the existing outside pipe (4 inch) was renewed. This was a great deal of digging (to make it fall down hill!) which was done by the boys and mum. Four loads of 3/4 inch trap stone was transported in van... more shovelling by the boys. I also added a perforated black pipe on top (4 inch). This is a pipe I bought for $10 from Hudson Valley Materials Exchange (now closed). It has been on the shed roof for years.

Saturday, May 21, 2011

Basement Bedroom 1

It all began in the summer 0f 2010 when DD realised he could get his room to himself if he helped JJ get a ne
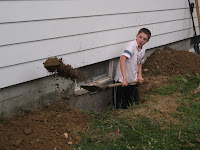
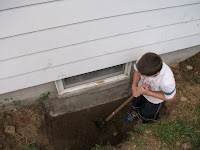
w room in the basement. The first thing was to dig access for a new escape window (two exits are required for all bedrooms). DD got off to a good start but lost steam when he realised that the room would not be ready until well into the year (now it's May 2011 and the room is still not ready!).

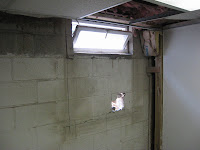
The next step was to cut out the concrete block wall for the new window; first, a hole in the gibboard. This hole allowed a lo
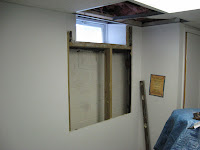
ok at the conrete wall behind the gibboard wall. This revealed mold 
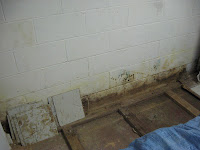
about a foot from the ground. So the gibboard wall had to be taken out and the wooden floor was soaking wet and moldy too. So the floor had to come out too. Neither wall or floor would be replaced. The wall would remain painted concrete and the floor finished with ceramic tile.

While the floor was uncovered it made sense to cut drainage ditches into the floor for perforated pipes. The moisture under the floor made this important too. Last time I did this in the boiler room I borrowed a jack hammer from Chris, my neighbour. But he has shifted. So I bought a similar jack hammer 
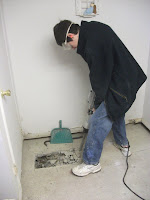
for this job. The pipe along the west wall 
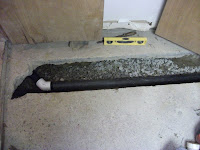
was connected to the existing pipe in the boiler room. This means that if either pump fails (the new bedroom or the boiler room) the water will 
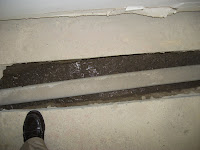
run to the other pump and there will be no flood. Also I put a 2 inch output pipe from the boiler room pump in the ditch last time. So this time I connected that to a new output pipe so the boiler room output pipe can go underground instead of running over head (I haven't connected it yet).

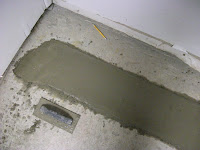
I cut the concrete blocks for the window, then knocked out the hole with a heavy hammer. Once the blocks were out to the way, carpenter ant damage was revealed in the south wall sill. About 8 feet of sill had to be replaced. Then the 
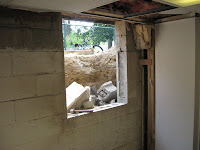
window went in. This window was bought new for the bathroom upstairs several years ago. It was a stock size smaller than the existing window. It never quite looked right so we took that out for the basement, and bought two new custom size windows for upstairs (bathroom and east bedroom). Those windows went in before the work began downstairs.

Motor Mower Carburettor

This red mower came from a neighbour (Catherine) who couldn't get it going, and left it sitting for years(?). The petrol had turned to gel and the carburettor and petrol tank had to be cleaned out. After that, it started up. I've used it for a year or so, and this spring when I started it up, it worked fine for most of the lawn, then suddenly stopped. So it seemed like time for another carburettor cleaning. I took photos so I would remember the route of the springs (and also made a sketch). The starting string broke too, so I had to take the top apart and re-attach that. The muffler has to come off to get the carburettor bolts off. Squirting carburettor cleaner into everything did the trick. It works fine now. Actually, it works better because I stretched the spring out a little so the choke would turn off sooner.

Friday, May 20, 2011

Escort Muffler

1997 Ford Escort: after work on the transmission, a joint in the exhaust pipe broke (between the bolted flange at the front (after/behind the catalytic converter) and the flex joint/pipe. Eddy (transmission mechanic) brazed it for free, but a few weeks later it broke again. This time I tried to fix it myself. I took the pipe off. The first bolt broke (on the flange), the second I cut off with an angle grinder cut off wheel. There is a bracket under the pipe in the middle of the car that had to come off (10 mm socket, six nuts). Then the muffler had to come off the pipe. This was held on with a clamp which was almost rusted away (like the bolts at the wharf). I disconnected the rubber brackets to pull the pipe back a little and was able to cut the clamp with the grinder. The muffler was still rusted on, so I cut the muffler pipe half way through and broke it off the pipe. Unfortunately I did not cut back far enough and it damaged the exhaust pipe. I thought that would have to be welded, but I managed to buy a small extension and an extra clamp to make up the difference.
A neighbour (Kevin) welded the broken joint back for me. I had to drive for more than a week without a muffler until he completed it. He has welded two parts in the lawn tractor for me too (the shaft for one of the blades [which I erroneously ground off], and the lever to raise the deck).
I sprayed some undercoating around where there were rusty areas and reinstalled the exhaust pipe. At first my new bolts were too short so I had to wait until the van came home to by some 1 1/2 inch bolts.
Lifetime warranty muffler: $109
Weld: $20
Clamps/bolts: $16.